IT Services

Forward All Incoming Calls to Another Extension or Phone Number

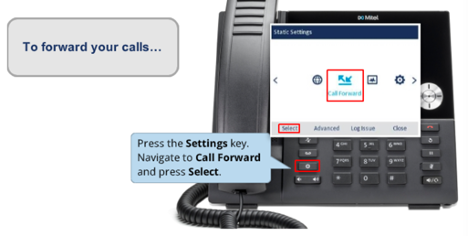
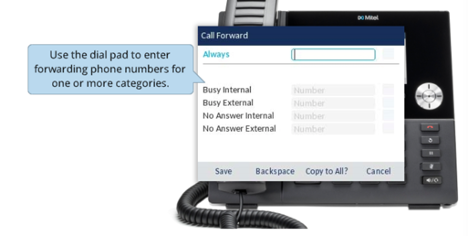
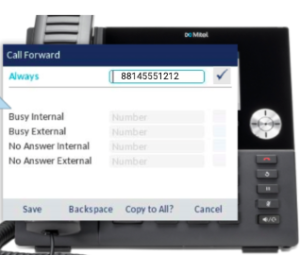
With furlough and vacations, it is often useful for employees to have their incoming calls forwarded to another extension in their department, or to a different number altogether.

  1. Press the Settings button (the “gear” icon on the lower left side of your phone keypad).
    Mitel 6920 desk phone with the "Settings" key highlighted
  2. Use the silver wheel on the phone to navigate left to Call Forward.
    Mitel 6920 desk phone with the "Call Forward" option showing in the screen
  3. Press Select.
    (If necessary, use the backspace button to erase any number in the box labeled Always.)
    Mitel 6920 desk phone showing the dialog screen for entering forwarding numbers
  4. Enter the 4-digit extension, or 10-digit number off campus, that you want to have your calls forwarded to in the Always box. Be sure to prefix an “8” before the number if it is not an on-campus extension.
  5. Before you save, use the wheel to navigate to the checkbox in the upper right corner of the display.
    Mitel 6920 phone showing the checkbox by the "Always" option
  6. Press the center button of the wheel to put a check in the box.
  7. Press Save.
  8. Press Close.

LITS has other tips for managing phones during vacations and furlough as well.

Tip Tuesday: Vacation Reply in Gmail

When you’re planning to be out of office, you can set an automatic vacation reply in Gmail. Here’s how:

  1. On your computer, open Gmail.
  2. In the top right, click Settings Settings and then See all settings.
  3. Scroll down to the “Vacation responder” section.
  4. Select Vacation responder on.
  5. Fill in the date range, subject, and message.
  6. Under your message, check the box if you only want your contacts to see your vacation reply.
  7. At the bottom of the page, click Save Changes.
Note: If you have a Gmail signature, it will be shown at the bottom of your vacation response.
On a related note, LITS also offers tips for managing phones during vacations and furloughs.
Subscribe to get LITS News and Updates in your inbox.

Tip Tuesday: “Out of Office” in Google Calendar

In Google Calendar, you can define a stretch of time when you will be out of office. This can be a few hours, a particular day, or a range of days. When you indicate you’re out of office, your calendar will automatically decline all meetings during that time, using a custom decline message if you choose.

  1. On your computer, open Google Calendar.
  2. At the top of your calendar, click the date you’ll be out of the office (or the first date, if you’re planning on multiple days).
  3. Click Out of office.
  4. Select the dates that you’ll be out of the office.
  5. Optional: Update the time range and edit your decline message.
  6. Click Save.

"Out of office" dialog box in Google Calendar

During the time when your status is set to Out of office, others who contact you through Google Chat messages or Gmail will see a notification alerting them to that fact. So will users who mention or tag you in comments in a Google Doc.

Subscribe to get LITS News and Updates in your inbox.

Tip Tuesday: Laptop Care

With so many of the college community working from laptop computers, it’s useful to keep some basic guidelines in mind for taking good physical care of your laptop. Here are some tips:

  • Wash your hands. In addition to helping protect against illness, washing your hands can help prevent dirt and oils from your skin from staining your laptop’s keys, touchpad, and other surfaces.
  • Keep food and drink away. Liquids, sugar, and food crumbs can interfere with keyboard function and damage electronics. It’s always best practice to keep liquids away from electronics.
  • Close carefully. It’s easy to forget a pen or paper clip is on the keyboard when you close the lid in a hurry. But such items can dent, scratch or even crack the screen. Be sure to close the laptop gently and carefully–don’t just snap it shut and go.
  • Don’t pick up by the monitor. This puts undue strain on the delicate electronics of the screen, and can result in damage to the hinges as well. Lift your laptop by the base, preferably with two hands, to prevent any twisting of the laptop frame.
  • Watch what you put on top. Heavy items and items with sharp edges can damage your laptop surprisingly easily. Even resting your hands or an elbow on top without thinking can damage delicate LCD screens. Cold or heat, such as from a can of soda or a mug of coffee, can likewise risk damage to your laptop.
  • Keep an even temperature. Rapid temperature changes can cause condensation inside your laptop, and glass and plastic components can crack from extreme cold. Try never to leave your laptop in a cold or hot car. If your laptop has become colder or warmer than room temperature, give it time to return to room temperature before turning it on.
  • Bag it. Bags made for a laptop are the safest way to transport a laptop from one place to another. If possible, use one sized specifically for your model of laptop. If that’s not an option, consider using a cushioned laptop sleeve to carry your laptop inside another bag, to keep other items in the bag from scratching or bending your laptop frame. If you’re using a sleeve, don’t put other items inside–even a mouse or the laptop’s own power supply can risk damage if they are pressed against the laptop cover.
  • Keep it clean. Check your laptop manufacturer’s website for their recommended methods. Properly used, compressed air and isopropyl alcohol wipes designed for electronics can be important tools for keeping your keyboard, monitor, and ports clean.

Subscribe to get LITS News and Updates in your inbox.

Tip Tuesday: Forward an Entire Gmail Conversation

Did you know you can forward an entire Gmail conversation thread at once? This can be useful if you want to bring someone new into the conversation without having to forward every individual email that’s been exchanged so far. It will save you and the new participant time sorting through each message one at a time.

Gmail offers a way to forward an entire email conversation all bundled into a single email, in chronological order with the oldest messages at the top.

To forward a conversation, first open it in Gmail on your computer. Then click on the “More” menu (the three dots in the toolbar at the top of the conversation.) Choose “Forward all.”

Screenshot of a sample Gmail conversation with the 'More' menu open

This will create a new message with the entire conversation all in one place.

You can then choose recipients and, if you like, add additional text at the top of the message. Click on the blue “Send” button and the recipients will get a single email message containing the entire Gmail conversation thread.

All attachments in the thread will also be included.

Note: “Forward all” will not show as an option in a conversation with only one message.

Subscribe to get LITS News and Updates in your inbox.

Tip Tuesday: Limit the Number of Responses in a Google Form Question

Some in our campus community have asked how to limit the number of responses to a question in a Google Form. Here’s how.

  1. In your form, make sure you choose “Checkboxes” for the type of question.
    Google Forms question type dialog box
  2. In the lower righthand corner, click on the three dots to show the “More” menu. Choose “Response validation”.
    "More" menu in a Google Forms question
  3. Choose “Select at most”.
    Response validation menu in Google Forms
  4. Fill in the maximum number of responses you want each respondent to give, and type in an error message that the form can give if the respondent exceeds the maximum.
    "Maximum number of responses" dialog in Google Forms
  5. Alternatively, you can limit the number of responses to a minimum instead of a maximum–for instance, if you want each respondent to indicate at least two answers.
    "Minimum responses" dialog in Google Forms

Learn more about Google Forms in the Google Workspace Learning Center.

Subscribe to get LITS News and Updates in your inbox.

Tip Tuesday: Set Your Status as Away in Google Chat

Did you know can choose from several status options in Google Chat? You can set your status as available, away, or busy until a set time. When you set your status to away, you will appear offline to others even if you are using Google Chat. This can be a useful way to communicate to others that you are not available.

To adjust your Google Chat settings, follow these instructions:

  1. Go to your Gmail or Google Chat account.
  2. Look for the Google Chat status menu. The default setting is Active.
    Google chat status menu set to Active
  3. To change your status, click the menu and select a new status from the dropdown list. In Gmail, the dropdown menu will look like this.Google chat dropdown menu in Gmail

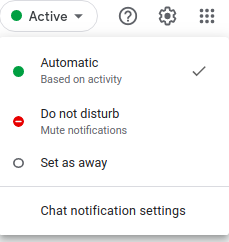
    In Google Chat, the dropdown menu will look like this.

    Google Chat dropdown in Google Chat

  4. If you want to be away long-term, set your status to “Away”. Otherwise, select “Do not disturb” for up to 24 hours.


Read more about adjusting your Google Chat status settings

Subscribe to get LITS News and Updates in your inbox.

Tip Tuesday: Schedule messages in Gmail

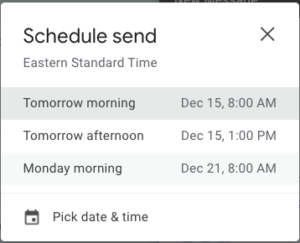
You can schedule messages in Gmail to be sent at a later date. This can be useful for reminders to yourself or others, or for communications where the time and date of delivery are especially important. Here’s how.

  1. On your computer, go to Gmail .
  2. At the top left, click Compose.
    "Compose" button in the Gmail interface
  3. Create your email.
  4. At the bottom left next to Send, click the dropdown arrow More send options.
    "Send" button with "Schedule Send" option chosen in Gmail
  5. Click Schedule send.
  6. Choose one of the suggested options, or click Pick date & time.
    "Schedule send" dialog box in Gmail
  7. You’ll see an alert pop up that says that your email has been scheduled.
    "Your email has been scheduled" popup in Gmail

Read more about scheduling emails.

Subscribe to get LITS News and Updates in your inbox.

Tech Tip Tuesday: Translate Closed Captions in Google Meet with Chrome

You can translate the captions in Google Meet to another language using the Chrome browser.

First, turn on captions for any Google Meet you are attending. Move your mouse over the screen, and a white bar should pop up at the bottom. Click on Turn on Captions.

Screenshot of Toolbar in Google Meet

Then right-click on the lower part of the screen, where the captions appear, and choose Translate to English. (This part is a little confusing, because it should already be in English. Bear with us!)
Screenshot of Google Meet Caption area

You’ll notice a small Google Translate icon appear in the address bar at the top of your Chrome browser (where the URL appears).

Click on the Translate icon, and then choose the three-dot menu:

Screenshot of Google Translate dialog box

Click on Choose Another Language… You will be given a choice of dozens of languages.

Screenshot of language selection options in Google Translate.

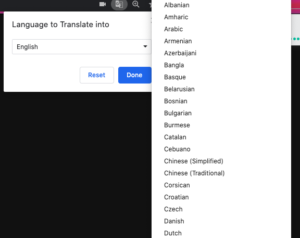
The captions will automatically translate into the language you choose. (So will any chat posts in the Meet.)

Bear in mind that automatic computer translation is prone to errors, so don’t rely on this to provide a perfect translation.

Subscribe to get LITS News and Updates in your inbox.