Tech Tip Tuesdays

Tech Tip Tuesday – Education OnAir

Google for Education’s Education OnAir offers a collection of webinars and other digital events focused on using Google tools and applications for educators. Upcoming webinars here are free for registration, and a plethora of prior webinars are available for viewing.

Multiple series of past-recorded webinars are also available,  including:

  • Global Distance Learning
  • G Suite (in education)
  • Google Classroom
  • Professional Development
  • and more

What types of tech tips would you like to see more of in future posts? We’d love to hear your feedback! Contact us at infodesk@allegheny.edu.
Tech Tip Tuesday – Record Audio in MacOS and Windows

Need to record some audio on your computer? Windows and Mac OS both have built-in, easy to use applications for doing so!

Record Audio in Windows 10 with Voice Recorder:

  1. Launch Voice Recorder by clicking the Start button, and begin typing “Voice Recorder”. (The application should populate in the search results.) Click Voice Recorder.
  2. Click the Record button to begin recording audio.
  3. When finished, click the Stop button. A new window will appear showing any recent recordings. You can listen to your recordings here.
  4. Right-click on your recorded clips for more options such as deleting, renaming, or opening the location of your file. (Recordings are saved in Documents > Sound recordings.)

Record Audio in mac OS with Voice Memos:

  1. Launch the Voice Memos application. (Open a new Finder window. Voice Memos can be located in the Applications folder.)
  2. Click the Record button. (Click Pause to pause your recording, and click Resume to continue.)
  3. When finished, click Done in the lower-right corner.
  4. Click the Play button to listen to your recording, or you can click the Edit button in the top-right corner to make changes to your recording.

Tech Tip Tuesday – Add Multiple Hyperlinks in a Single Cell in Google Sheets

A new feature was recently released for Google Sheets which allows you to add multiple hyperlinks in the same cell.

You can now do so by highlighting specific words or strings in a cell and clicking on the link button in the toolbar (or Ctrl+K/Cmd+K if you prefer keyboard shortcuts!)

Image of the insert hyperlink button on the toolbar

Repeat this process to add multiple hyperlinks in the same cell.

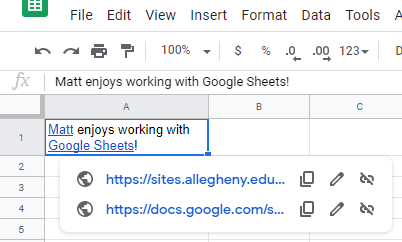
When hovering over a cell that contains multiple links, they are displayed sequentially, in a box below the cell:

Image of multiple hyperlinks in a single cell

Lastly, if you right-click on a cell containing multiple hyperlinks, you can open them all at once!

Tech Tip Tuesday – Navigating Digital Information

Today’s tech tip highlights a 10-episode series from Youtube channel Crash Course, titled “Navigating Digital Information”.

Throughout this free course, host John Green will provide practical skills to help evaluate information and help you stay more informed online.

Check out the video below for a preview video for the series:

If you liked the video and would like to learn more, the full course is available here.

Tech Tip Tuesday – Delete your Browsing History (Part 2)

A recent Tech Tip Tuesday post detailed how to clear your browsing history in the popular Google Chrome and Mozilla Firefox browsers. Today’s tip will demonstrate how to do so in Safari and Microsoft Edge. Deleting your browsing history, or clearing your cache, is often a great first troubleshooting step to take when a website doesn’t load correctly on your computer – whether the site is slow to load, returns an error message, or becomes unresponsive.

Clear your history in Safari (on Mac):

  1. In the Safari app, choose HistoryClear History, then click the pop-up menu.
  2. Select how much history you want cleared.

Clear your history in Microsoft Edge: 

  1.  In the Edge application, Select Settings  > Privacy and security.
  2. Under Clear browsing data, select Choose what to clear.
  3. Choose a time range from the Time range drop-down menu.
  4. Choose the types of data you want to clear. For example, you may want to remove browsing history and cookies but keep passwords and form fill data.
  5. Select Clear now.

Tech Tip Tuesday – Delete Your Browsing History

Deleting your browsing history, or clearing your cache, is often a great first troubleshooting step to take when a website doesn’t load correctly on your computer – whether the site is slow to load, returns an error message, or becomes unresponsive. See below how to delete your browsing history in both Google Chrome and Mozilla Firefox.

Clear your history in Google Chrome:

  1. Open Chrome
  2. Click More, (the 3 vertical dots), in the top right.
  3. Click History > History.
  4. Click Clear browsing data on the left.
  5. Select how much history you want to clear from the drop-down menu. Select All time to clear everything.
  6. Check the boxes for the info that you want cleared.
  7. Click Clear data. 

Clear your history in Mozilla Firefox:

  1. Click the Library button , click History, then click Clear Recent History…
  2. Select how much history you want to clear from the drop-down menu.
  3. Check the boxes for the info that you want cleared.
  4. Click the Clear Now button.

Tech Tip Tuesday – Google Drive Shortcuts

Shortcuts can make it easier to find and organize files – especially in Google Drive!

Creating a shortcut is easy:

  1. Go to Google Drive.
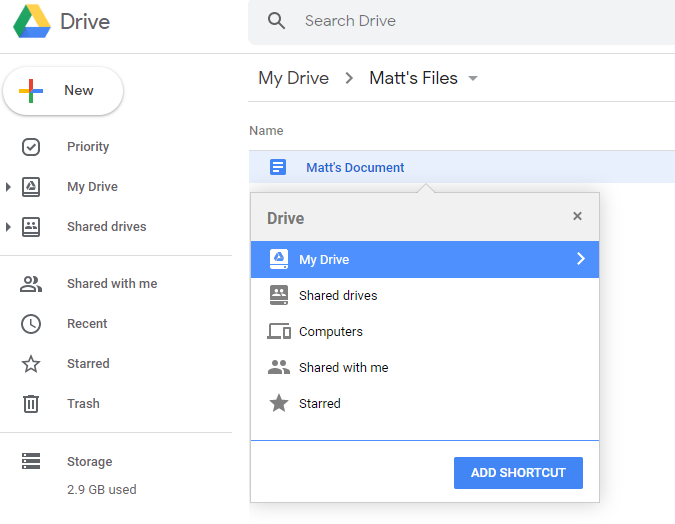
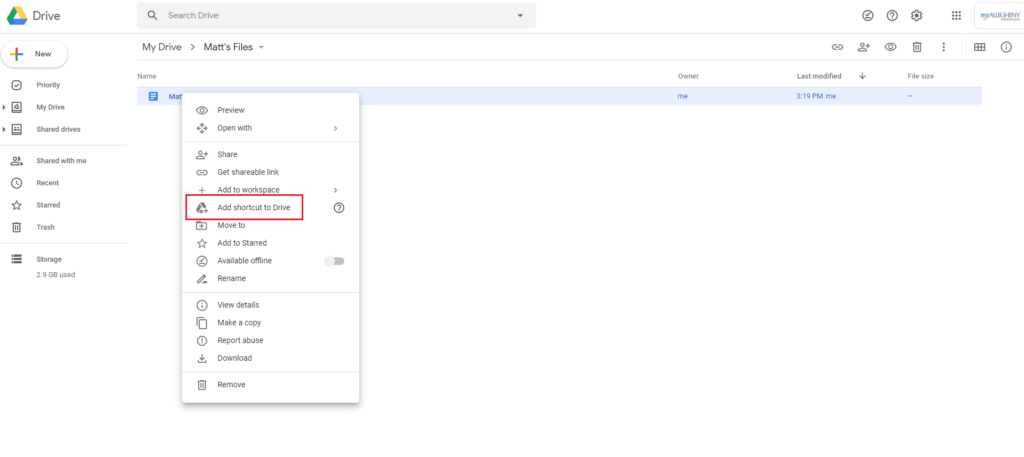
  2. Right-click the file or folder where you want to create the shortcut. Click Add shortcut to Drive.
  3. Select the location where you would like to place the shortcut and click Add shortcut.

To learn more about shortcuts in Google Drive, including instructions for Android and iOS, see the related Google Drive Help article.

Tech Tip Tuesday – Google Hangouts Meet Cheat Sheet

Available from the G Suite Learning Center, the Hangouts Meet cheat sheet is a handy quick reference which includes how to do the following with Meet:

  1. Schedule a video meeting from Calendar.
  2. Start a video meeting.
  3. Join a video meeting.
  4. Collaborate during a video meeting.

Additional resources for Meet, as well as other tools for teaching, learning, and working through disruption are also available on the LITS home page.

Tech Tip Tuesday – How to Use Multiple Desktops in Windows 10

Using multiple virtual desktops can be very helpful, and is easy to set up and use in Windows 10. If you keep a lot of applications open at one time, this can be a convenient way to keep organized.

  • To add a desktop:

    • Open up the Task View pane by clicking the Task View button, or by pressing the Windows Key + TabScreenshot of Task View Button
    • Click New Desktop.
  • To switch between desktops:

    • Open the Task View pane and click on the desktop you would like to switch to.
    • You can also quickly switch between desktops with the keyboard shortcuts Windows key + Ctrl + Left Arrow and Windows key + Ctrl + Right Arrow.
  • To move windows between desktops:

    • Open the Task View pane and hover your cursor over the desktop containing the window that you want to move. (The windows on the selected desktop will pop up.)
    • Find the window that you want to move, right-click it, select Move to, and choose the desktop you want to move the window to. (You can also drag and drop windows to the desired desktop!)
  • To close desktops:

    • Open the Task View pane, hover over the desktop that you want to close, and click the small that appears in the top-right corner.
    • You can also close desktops with the keyboard shortcut Windows Key + Ctrl + F4.