Tech Tip Tuesdays

Tip Tuesday: Limit the Number of Responses in a Google Form Question

Some in our campus community have asked how to limit the number of responses to a question in a Google Form. Here’s how.

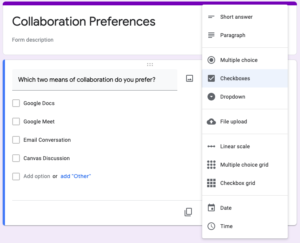
  1. In your form, make sure you choose “Checkboxes” for the type of question.
    Google Forms question type dialog box
  2. In the lower righthand corner, click on the three dots to show the “More” menu. Choose “Response validation”.
    "More" menu in a Google Forms question
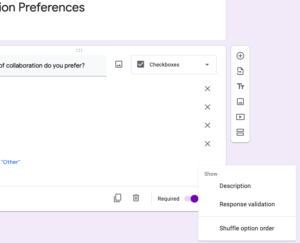
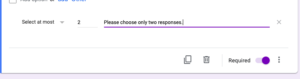
  3. Choose “Select at most”.
    Response validation menu in Google Forms
  4. Fill in the maximum number of responses you want each respondent to give, and type in an error message that the form can give if the respondent exceeds the maximum.
    "Maximum number of responses" dialog in Google Forms
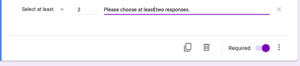
  5. Alternatively, you can limit the number of responses to a minimum instead of a maximum–for instance, if you want each respondent to indicate at least two answers.
    "Minimum responses" dialog in Google Forms

Learn more about Google Forms in the Google Workspace Learning Center.

Subscribe to get LITS News and Updates in your inbox.

Tip Tuesday: Set Your Status as Away in Google Chat

Did you know can choose from several status options in Google Chat? You can set your status as available, away, or busy until a set time. When you set your status to away, you will appear offline to others even if you are using Google Chat. This can be a useful way to communicate to others that you are not available.

To adjust your Google Chat settings, follow these instructions:

  1. Go to your Gmail or Google Chat account.
  2. Look for the Google Chat status menu. The default setting is Active.
    Google chat status menu set to Active
  3. To change your status, click the menu and select a new status from the dropdown list. In Gmail, the dropdown menu will look like this.Google chat dropdown menu in Gmail

    In Google Chat, the dropdown menu will look like this.

    Google Chat dropdown in Google Chat

  4. If you want to be away long-term, set your status to “Away”. Otherwise, select “Do not disturb” for up to 24 hours.


Read more about adjusting your Google Chat status settings

Subscribe to get LITS News and Updates in your inbox.

Tip Tuesday: Schedule messages in Gmail

You can schedule messages in Gmail to be sent at a later date. This can be useful for reminders to yourself or others, or for communications where the time and date of delivery are especially important. Here’s how.

  1. On your computer, go to Gmail .
  2. At the top left, click Compose.
    "Compose" button in the Gmail interface
  3. Create your email.
  4. At the bottom left next to Send, click the dropdown arrow More send options.
    "Send" button with "Schedule Send" option chosen in Gmail
  5. Click Schedule send.
  6. Choose one of the suggested options, or click Pick date & time.
    "Schedule send" dialog box in Gmail
  7. You’ll see an alert pop up that says that your email has been scheduled.
    "Your email has been scheduled" popup in Gmail

Read more about scheduling emails.

Subscribe to get LITS News and Updates in your inbox.

Tech Tip Tuesday: Translate Closed Captions in Google Meet with Chrome

You can translate the captions in Google Meet to another language using the Chrome browser.

First, turn on captions for any Google Meet you are attending. Move your mouse over the screen, and a white bar should pop up at the bottom. Click on Turn on Captions.

Screenshot of Toolbar in Google Meet

Then right-click on the lower part of the screen, where the captions appear, and choose Translate to English. (This part is a little confusing, because it should already be in English. Bear with us!)
Screenshot of Google Meet Caption area

You’ll notice a small Google Translate icon appear in the address bar at the top of your Chrome browser (where the URL appears).

Click on the Translate icon, and then choose the three-dot menu:

Screenshot of Google Translate dialog box

Click on Choose Another Language… You will be given a choice of dozens of languages.

Screenshot of language selection options in Google Translate.

The captions will automatically translate into the language you choose. (So will any chat posts in the Meet.)

Bear in mind that automatic computer translation is prone to errors, so don’t rely on this to provide a perfect translation.

Subscribe to get LITS News and Updates in your inbox.

Tip Tuesdays: Recording Your Presentation

As we near the end of the semester, here’s a reminder for faculty and students that you can record a presentation using Google Meet.

A few things to bear in mind:

  • You can use Meet to record video of yourself, or to record audio over a slideshow or other presentation that you’ve prepared. This is a great way to add audio to your Google Slides presentation, for instance.
  • Meet recordings are automatically saved to your Google Drive in a folder titled “Meet Recordings” and can be shared like any other file in your Google Drive.
  • You have unlimited storage for Meet recordings.
  • If other people are participating in your Google Meet, please remember to get their permission to record.

Subscribe to get LITS News and Updates in your inbox.

Tech Tip Tuesday – Enable Dark Mode on your Mac

A few months ago we posted on how to enable “dark mode” on your Windows 10 device. Did you know that dark mode is also available on your Mac? Here’s how to enable it:

  1. Choose Apple menu > System Preferences
  2. Click General.
  3. Select one of the Appearance options at the top of the window:
  • Light: Use the light appearance.
  • Dark: Use the dark appearance.
  • Auto: Automatically use the light appearance during the day, and the dark appearance at night.

General System Preferences window with Dark Appearance selected

Read more about Mac’s Dark Mode on the Apple Support site.

Subscribe to get LITS News and Updates in your inbox.

Tech Tip Tuesday: Deleting Outdated Passwords on a Mac

When you find that a password for a website or the wifi isn’t working, it’s possible that your Mac is retaining an older password. This is especially likely if your password has changed since the last time you used it on your Apple devices.

Macs use a feature called Keychains to store this information. While this is a useful feature, it can sometimes keep you out of an account if your password has changed.

You can delete outdated Keychain passwords. Here’s how:

1. Open the Keychain Access app from the Applications window on your Mac.
2. Find the Keychain you want to delete, and select it with a click.
3. From the File menu, choose Delete Keychain [keychain name].
4. Select Delete References.

The next time you visit the website or try to log onto the wifi, you will need to re-enter your username and your new password.

Tech Tip Tuesday: Manage App Shortcuts on Chromebook Desktop

Add, Move, and Remove App Shortcuts on Chromebook Desktop

You can add an app that you use often to your desktop on a Chromebook.

Add an app

  1. In the corner of your screen, click the Launcher  and then Up arrow .
  2. Find the app you want to add.
  3. Right-click the app icon.
  4. Click Pin to Shelf.

When you pin an app to your shelf, the app will stay there until you move or remove it.

Change the order of the apps

To change the position of an app:

  1. Click and hold the app you want to move.
  2. Drag it to a new position.
  3. Release to put the app in a new spot.

Remove an app

  1. Right-click the app you want to remove.
  2. Click Unpin.

Learn more

Google provides an interactive tutorial for working with apps on your Chromebook.

Subscribe to get LITS News and Updates in your inbox.

Tech Tip Tuesday: Pin important emails to the top of your Gmail inbox

You can pin certain emails to the top of your Gmail inbox. Here’s how.

First, click on the little gear-shaped Settings icon in the upper right corner of your Gmail window. This will open a Quick Settings menu.

Quick Settings menu in Gmail

Scroll down to the section labeled Inbox Type.

Inbox Type menu in Gmail

Choose Starred first.

Close the Settings menu.

Then, in your inbox, simply click the star next to any emails you want to appear at the top of the list, in a separate section. It will add another section below the Starred section, labeled Everything Else. As you can see in the screenshot below, there are five starred email conversations in the inbox.

Gmail inbox sorted with starred items first

Any conversation that you have starred will stay at the top of the list until you remove the star (simply by clicking on the star again) or remove the conversation from your inbox by archiving or deleting it.

Similarly, you can pin unread emails to the top by choosing Unread first instead of Starred first.